



The electrical rough-in passes inspection, but three weeks later drywall crews find half the boxes are mounted at the wrong height. Foundation waterproofing gets signed off, then backfill begins before anyone notices the membrane wasn't properly lapped at the corners. MEP coordination drawings look perfect until the plumber starts running waste lines through spaces already claimed by HVAC ducts.
These aren't random quality failures. They're predictable breakdowns that happen when construction qa-qc systems treat quality as a separate track rather than embedding it into phase transitions. After going through quality data from dozens of commercial projects, the pattern is consistent: defects that cost $500 to fix during their original phase balloon to $5,000 rework orders two phases later. The real problem isn't that crews don't care or that inspectors miss things. It's that most projects run quality control as a parallel process—something that happens alongside the work rather than gating progression between phases. When QA becomes a checkbox exercise performed after work completes, you've already lost the opportunity to catch issues at their cheapest correction point.
Why traditional inspection models break at phase boundaries
Walk any active construction site and you'll see quality control happening constantly. Foremen check work, inspectors review installations, superintendents walk the job. Yet defects still cascade through phases, multiplying in cost and schedule impact.
The breakdown happens at transition points. A framing crew completes their scope and moves to the next building while rough electrical begins. Framers passed their inspection, electricians will get their own inspection, but nobody owns the quality handoff between trades. Small misalignments compound. A stud placed 14.5" on center instead of 16" doesn't fail framing inspection, but it creates a nightmare for the drywall crew three weeks later.
Traditional inspection approaches treat each trade's work as isolated. The framer gets inspected on framing criteria. The electrician on electrical standards. The plumber on plumbing code. But real construction defects tend to emerge at the intersections—where one trade's acceptable tolerance becomes another trade's blocking issue.
Concrete placement tolerances are a good example. A slab within acceptable flatness specs might still create problems for the flooring contractor if high spots cluster near doorways. The concrete passed inspection because it met ACI standards, but now you're grinding concrete at $50 per square foot because nobody checked the specific areas critical for finish flooring transitions.
Phase gate quality control flips this model. Instead of inspecting completed work against trade-specific standards, you create quality gates that must be cleared before any crew can progress to the next phase. These gates focus on interface conditions—the exact points where one trade's work becomes the substrate for the next.
Building a construction qa-qc system around phase gates
Effective phase gate QA starts with accepting that different defect types need different sampling strategies. You can't inspect every single electrical box placement, but you also can't rely on random spot checks for critical structural connections.
Keep your construction projects on schedule and budget.
Projbrick helps you plan, track, and manage every project phase with precision and ease.
- Real-time project tracking
- Resource & budget management
- Team collaboration tools
No credit card required
Start by mapping your project phases with clear entry and exit criteria. Not generic phases like "rough-in" or "finishes," but specific, measurable transition points:
-
Phase Gate 1
Foundation to Vertical - Anchor bolt placement verified within 1/4" of design - Foundation top elevation checked at 10' grid - Waterproofing membrane integrity tested at all penetrations - Rebar projection heights confirmed for vertical connections
-
Phase Gate 2
Structure to Rough MEP - All structural members within tolerance for MEP routes - Floor deck deflection tested at maximum span locations - Beam pocket depths verified for mechanical units - Fire-stopping rough openings sized and located
Each gate needs specific sampling plans based on defect risk and correction cost. For repetitive elements like stud spacing, a 10% random sample might be enough. For critical items like beam bearing conditions, you need 100% inspection.
The sampling methodology changes based on what you're checking:
Dimensional Compliance Sampling Check 1 in 10 for standard dimensions (stud spacing, blocking height), but increase to 1 in 3 for critical dimensions (bearing wall positions, mechanical shaft openings). If you find a defect rate above 5% in your sample, expand to 100% inspection for that element.
System Performance Sampling For items like waterproofing or fireproofing, use grid-based sampling with increased density at high-risk areas. Test every 500 square feet in field conditions, but every 50 square feet at penetrations, corners, and transitions.
Interface Verification Sampling Where trades intersect, use overlapping responsibility zones. Both the completing trade and the following trade sign off on interface conditions. This creates natural accountability since the incoming trade won't accept substrate conditions that will cause them problems downstream.
Require both completing and incoming trades to sign interface verifications to create clear accountability and prevent disputes at handoffs.
This diagram summarizes how phase-gate inspections, sampling plans, and triage feed into go/no-go decisions at transitions.
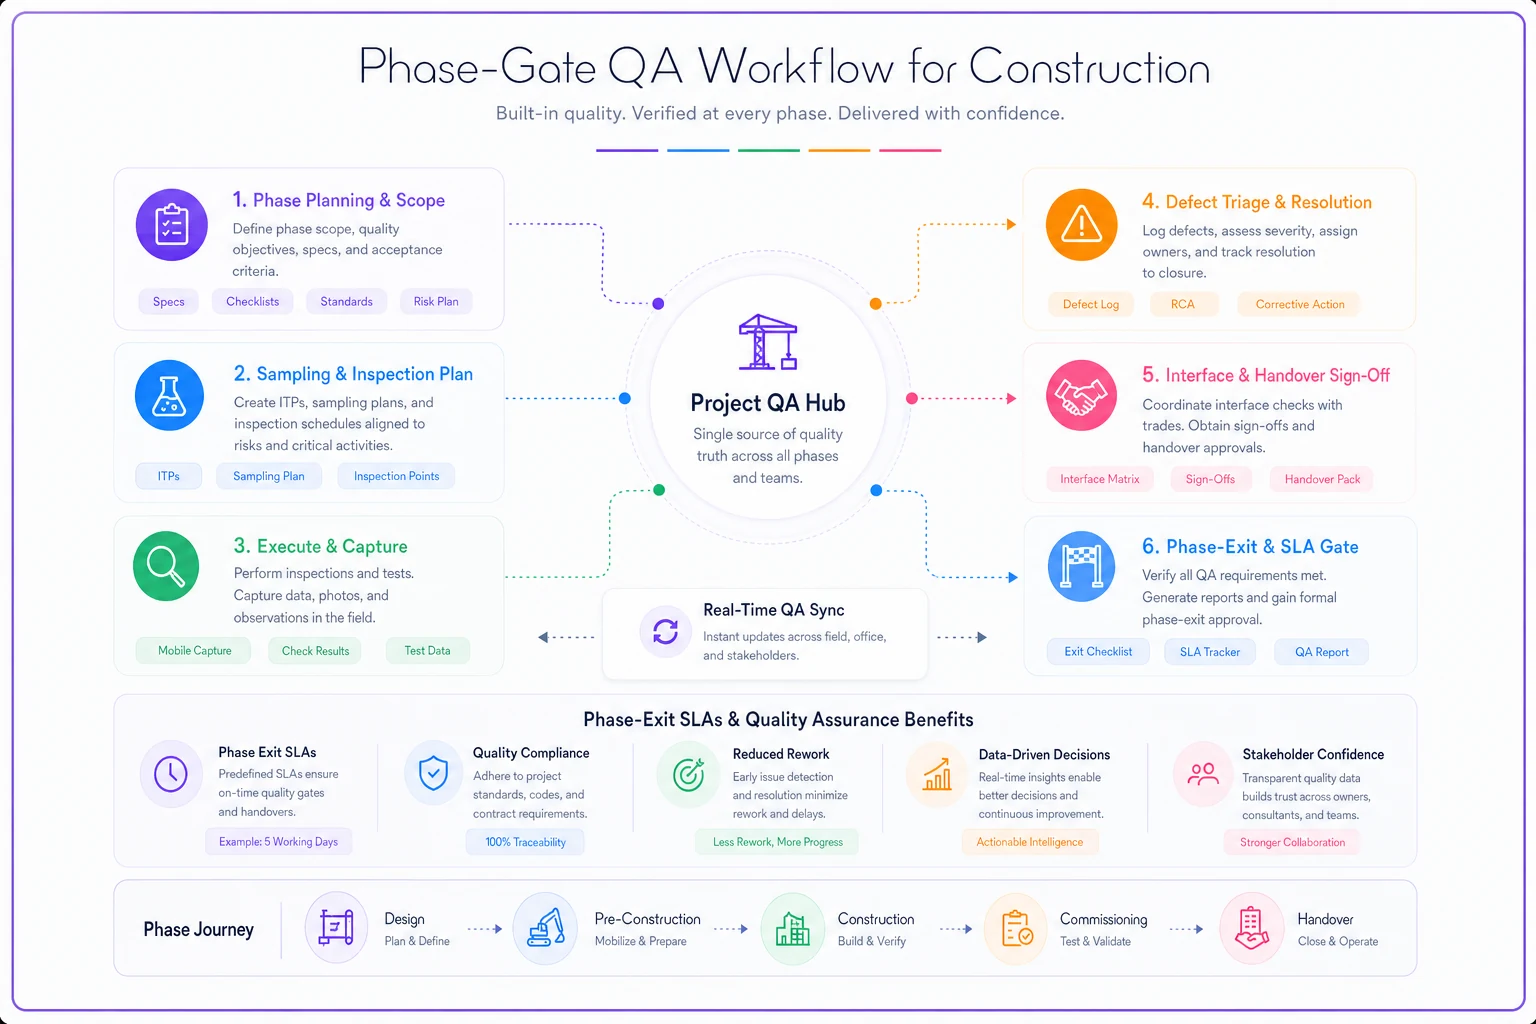
Each gate's sampling rules and defect thresholds drive whether work is accepted, corrected, or stopped before the next trade starts.
The defect triage matrix that actually gets used
Most quality programs generate long defect lists that nobody acts on. Everything becomes "important" so nothing gets prioritized. Superintendents end up making gut-feel decisions about what to fix now versus what to defer.
A functional defect triage matrix cuts through this by pre-defining response protocols based on two factors: correction cost growth and schedule impact growth. Not current cost or current impact—how those factors change if left unaddressed.
Category A: Exponential Growth Defects Fix immediately, no exceptions. These are defects where correction cost doubles every phase or creates blocking conditions for follow-on work. Examples: foundation elevation errors, structural member misalignment, utility rough-in location mistakes.
Category B: Linear Growth Defects Fix before phase exit. Correction cost increases predictably with each phase. Examples: minor dimensional variances, surface preparation issues, missing backing or blocking.
Category C: Static Cost Defects Document and batch for correction. Cost stays roughly constant regardless of when fixed. Examples: cosmetic damages, minor finish defects, paint touch-ups.
Category D: Diminishing Impact Defects Document only, fix if convenient. The defect becomes less relevant as work progresses. Examples: temporary construction damages in areas slated for demolition, minor substrate issues that will be covered by finish materials.
| Category | Action | Examples |
|---|---|---|
| Category A: Exponential Growth Defects | Fix immediately, no exceptions. | These are defects where correction cost doubles every phase or creates blocking conditions for follow-on work. Examples: foundation elevation errors, structural member misalignment, utility rough-in location mistakes. |
| Category B: Linear Growth Defects | Fix before phase exit. | Correction cost increases predictably with each phase. Examples: minor dimensional variances, surface preparation issues, missing backing or blocking. |
| Category C: Static Cost Defects | Document and batch for correction. | Cost stays roughly constant regardless of when fixed. Examples: cosmetic damages, minor finish defects, paint touch-ups. |
| Category D: Diminishing Impact Defects | Document only, fix if convenient. | The defect becomes less relevant as work progresses. Examples: temporary construction damages in areas slated for demolition, minor substrate issues that will be covered by finish materials. |
The key is defining these categories before work starts, not during defect walks. When the superintendent finds missing fire blocking, they already know it's Category A—fix now. When they spot a damaged piece of sheathing in an area getting brick veneer, it's Category D—document and move on.
Each category triggers specific workflows:
Category A triggers immediate stop-work in the affected area. The trade foreman gets notified within 2 hours, correction must begin within 24 hours, and re-inspection happens before any dependent work proceeds.
Category B goes on the phase exit punch list. The responsible trade must complete corrections before their contract phase releases. No payment release until Category B items clear.
Category C defects accumulate into batch work orders, scheduled during natural workflow gaps—like when the electrical crew is waiting for inspection or during weather delays.
Category D items go into the project record but need no action unless they escalate due to scope changes.
Phase exit criteria that prevent downstream disasters
The most expensive rework happens when defects hidden by completed work surface during later phases. Misaligned anchor bolts discovered after steel erection. Plumbing waste lines that clash with structural beams. Electrical homerun routes conflicting with mechanical ducts.
Strong phase exit criteria catch these issues at the last cheap correction point. Generic checklists don't cut it though—every project needs phase exits tailored to its specific coordination challenges and risk areas.
Your phase exit criteria should cover four things:
1. Dimensional Tolerance Stackup Verification Before closing walls, verify that dimensional variations won't accumulate into problems. If three trades each use their maximum allowable tolerance in the same direction, will the finish materials still fit? For example, if framing is 1/4" out, electrical boxes protrude 1/8" beyond spec, and drywall thickness varies 1/8", you've consumed 1/2" of tolerance that might prevent cabinet installation. Check tolerance stackup at critical locations: kitchen runs, bathroom fixtures, millwork walls.
2. System Integration Testing Don't just verify that individual systems work—confirm they work together. Before insulation and drywall, run water through plumbing while HVAC operates. You'll catch vibration issues, expansion noise, and condensation problems that only show up under combined operation. Run temporary power to mechanical equipment and operate it for a few hours. This finds undersized electrical feeds, vibration transmission, and exhaust fans that backdraft when air handlers run.
3. Access Preservation Verification Map every future access requirement before covering work. Will the HVAC filter be reachable? Can the plumber service the trap primer? Is there attic access above every VAV box? Create an access map showing required clearances and service zones. The mechanical contractor marks every component needing future access. The framing contractor confirms paths before installing finishes. Both sign off that access routes remain clear.
4. Correction Window Confirmation Before phase exit, confirm that any documented Category B or C defects can still be corrected efficiently. A missing joist hanger is cheap before insulation, expensive after drywall, and nearly impossible once flooring is installed. Set correction deadlines based on work sequence, not calendar dates. "Fix before insulation install" is more meaningful than "fix by November 15th" when schedules shift constantly.
Trade-specific sampling plans that catch real problems
Generic quality checklists miss trade-specific failure patterns. Each trade has predictable defect clusters that need targeted sampling strategies.
Concrete Placement Sampling Instead of random slump tests, tie testing to pour conditions. Test the first truck, last truck, and every truck that sits more than 45 minutes. Test after any water addition. Sample at different placement locations since crews at the pump handle concrete differently than crews at the truck chute. For slab flatness, check a 10-foot grid in traffic areas but expand to a 5-foot grid near doors and equipment pads. Measure elevation at every column base and mechanical pad. These targeted checks catch the flatness issues that actually cause problems.
Framing Accuracy Sampling Don't measure every stud—focus on aggregation points. Check wall length at corners, door openings, and intersections. That's where small spacing errors compound into bigger problems. For multi-story wood framing, measure cumulative height every 10 studs horizontally and every floor vertically. A 1/16" variance per stud becomes 2" over 30 studs—enough to throw off window installation.
MEP Coordination Sampling Rather than checking every hanger and support, focus on transition zones. Where pipes change direction, where ducts resize, where multiple systems converge. These points have the highest failure rates and costliest correction impacts. Create coordination check zones at 25-foot intervals along main runs. Within each zone, verify clearances, slope, support spacing, and insulation/jacket integrity. This catches systemic issues without measuring every foot of installation.
Envelope Integrity Sampling Skip random window inspections. Test the first installation of each window type, then spot-check around 20% focusing on condition changes: different installers, different wall types, different exposure conditions. For air barrier continuity, use targeted blower door testing at phase gates rather than waiting for final test. Test after framing but before insulation. Test again after rough MEP but before drywall. These incremental tests catch leaks while they're still accessible.
Acceptance SLAs that maintain momentum
Quality control without timelines becomes a bottleneck. Crews stand idle waiting for inspections. Work proceeds at risk because approvals lag. The schedule slips while everyone points fingers.
Effective phase gate QA needs embedded SLAs that keep work moving while maintaining quality standards:
Inspection Request to Inspection Start: 24 hours maximum When a trade contractor requests phase gate inspection, it must begin within one working day. This prevents the "we're ready but waiting for QC" delay that kills productivity. If QC can't meet this SLA, the trade can proceed at risk with photo documentation.
Inspection Start to Preliminary Result: 4 hours maximum Initial pass/fail determination happens same day. The inspector identifies any Category A defects immediately so correction can begin. Detailed reports can follow, but crews need immediate feedback to maintain workflow.
Defect Notice to Correction Plan: 8 hours maximum When inspectors identify defects, the responsible trade provides a correction plan within one shift. Not necessarily complete correction, but a plan with timeline and method. This prevents defects from sitting while trades argue about responsibility.
Correction Complete to Re-inspection: 16 hours maximum Once a trade completes defect correction, re-inspection happens within two shifts. Quick turnaround prevents corrected work from holding up dependent activities.
These aren't arbitrary timelines—they're built around typical crew mobilization cycles. A framing crew can't sit idle for three days waiting for inspection, but they can pivot to another area for 24 hours while staying reasonably productive.
Build contingencies into your SLAs too. If QC misses an inspection window, define what happens: Does work proceed at risk? Does the schedule automatically extend? Who absorbs delay costs? Clear protocols prevent arguments when timelines slip.
Sample forms and tracking templates
The best construction qa-qc system falls apart without simple, field-friendly documentation. Superintendents won't use complex forms under schedule pressure. Foremen won't fill out lengthy reports. Inspectors need templates that capture essential data without turning into paperwork exercises.
Phase Gate Sign-off Form Keep it single page:
-
Phase identification (from/to trades)
-
Checklist of exit criteria (pass/fail checkboxes)
-
Defect categories identified (A/B/C/D counts)
-
Sign-offs (completing trade, incoming trade, QC)
-
Hold points noted (what can't proceed until cleared)
Defect Triage Record One line per defect:
-
Location (grid reference)
-
Category (A/B/C/D)
-
Correction trigger (immediate/phase exit/batch/none)
-
Responsible trade
-
Correction deadline
-
Re-inspection requirement (yes/no)
Sampling Record Template Document what you checked, not just results:
-
Element type (walls/slabs/rough-ins)
-
Sample size (1 in 10, 100%, grid points)
-
Acceptance criteria (tolerance/standard)
-
Failures found (count and percentage)
-
Sample expansion triggered (yes/no)
Trade Handoff Checklist Both trades sign one form:
-
Interface conditions verified (list specific items)
-
Dimensional tolerances confirmed
-
Access routes preserved
-
Known defects acknowledged
-
Acceptance with exceptions noted
Don't try to track everything. Focus on data that actually drives decisions: defect trends by trade, correction costs by category, phase gate cycle times. If a metric isn't influencing any decisions, stop tracking it.
The technology layer that scales quality control
Paper forms and spreadsheets work fine on a single project but start breaking down when you're managing multiple sites. Manual tracking can't identify patterns across phases or give you any early warning about where quality issues are likely to surface next.
This is where AI-powered operational software genuinely changes how construction qa-qc systems function—shifting them from reactive inspection toward something closer to predictive quality management. Rather than inspectors manually checking work against static checklists, these platforms analyze defect patterns across projects to flag risk areas before problems compound.
Modern platforms can track defect rates by specific crews, identify when a subcontractor's quality metrics start declining, and automatically adjust sampling rates based on historical performance. When the same framing crew that had elevated defect rates on Building A starts work on Building B, the system bumps inspection frequency on their work without anyone having to manually flag it.
The real efficiency gain is in workflow automation. Inspection requests trigger automatic scheduling based on inspector availability and project priority. Defect notifications go directly to responsible trades with correction deadlines tied to work sequence. Re-inspection queues generate automatically when corrections are logged complete.
For multi-site operations, centralized quality dashboards show performance across all projects at once. You can see which superintendents consistently achieve better first-pass rates, which trades need more oversight, and which phase gates are creating the most schedule friction. Over time that data shapes better subcontractor selection, smarter crew assignments, and more targeted training.
Quality data also feeds back into project planning systems in useful ways. Historical defect rates by trade and phase help build more realistic schedules. Strong quality metrics can accelerate closeout processes, with high-performing trades getting expedited payment processing.
Making phase gate QA stick in field operations
The best quality system fails if field teams don't actually use it. Most construction qa-qc systems don't fall apart from bad design—they fail from poor adoption. Superintendents skip inspections under schedule pressure. Foremen pencil-whip forms to avoid delays. Inspectors get stretched thin and start rubber-stamping approvals.
Successful implementation means embedding quality gates into the natural workflow rather than adding extra steps on top of it. When the framing contractor can't start walls until the foundation phase gate clears, compliance becomes automatic. When payment applications require phase gate sign-offs, documentation follows naturally.
Start with a single phase gate on one project. Pick a problematic transition—foundation to framing, or rough-in to finishes. Build the exit criteria, sampling plans, and defect matrix for just that one transition. Run it for a month, get feedback from the field, refine it, then expand.
Train trades on the defect categories during prebid meetings, not after contract award. When subcontractors understand that Category A defects stop payment processing while Category D items get documented and left alone, they'll self-police more effectively. They'll also price quality requirements accurately rather than pushing back on them after starting work.
Create quality metrics that mean something to each stakeholder. Superintendents care about first-pass acceptance rates that affect schedule. Trade contractors focus on defect rates that affect payment. Owners want trending data showing quality improvement over time. When everyone has something at stake, the system sustains itself.
And adjust based on results. If certain inspections never find defects, reduce sampling. If specific trades consistently pass phase gates cleanly, give them earned autonomy with reduced oversight. Quality systems that don't evolve become checkbox exercises that people learn to game.
The payoff shows up in stages. First you'll see fewer emergency rework orders as Category A defects get caught early. Then correction costs drop as issues get fixed during the cheapest window. Eventually schedule predictability improves because hidden defects stop blowing up timelines.
For any construction operation serious about preventing rework, phase gate quality control isn't optional—it's the foundation everything else depends on. The question isn't whether to implement it, but how quickly you can get it in place before the next expensive defect slips through.
The payoff shows up in stages. First you'll see fewer emergency rework orders as Category A defects get caught early. Then correction costs drop as issues get fixed during the cheapest window. Eventually schedule predictability improves because hidden defects stop blowing up timelines.
For any construction operation serious about preventing rework, phase gate quality control isn't optional—it's the foundation everything else depends on. The question isn't whether to implement it, but how quickly you can get it in place before the next expensive defect slips through.
Ready to build smarter and faster?
Join 2,000+ construction teams using Projbrick to improve project visibility, reduce delays, and increase profitability.