


The finish trades are where schedules go to die quietly. Not with a blown pour or a failed structural inspection — those get everyone's attention. Finishes fail slowly, one wavy skirting board and one roller-marked wall at a time, until the closeout walk turns into a 400-item punch list and the client's rep is photographing every reveal with a flashlight held sideways.
The problem isn't that painters and joiners do bad work. It's that nobody defined "done" on paper before they started, so acceptance becomes an argument at the worst possible moment — when there's no float left and the handover date is fixed.
This is a tight, trade-level acceptance packet for paint and joinery specifically. Sampling locations, a defect-severity matrix, remediation SLAs, and a final sign-off checklist. The whole point is to catch rework early, when a crew can fix a batch of doors in a day, not late, when you're chasing a subcontractor who's already demobilized.
Why finish defects show up late (and why that's the expensive part)
Finish work is cumulative and forgiving in the wrong way. A slightly proud architrave looks fine on its own. Paint that's one sheen level off looks fine until it's next to the correct sheen under raking light. Nobody flags these things individually because in isolation they pass. It's only when the surfaces sit next to each other — under final lighting, cleaned — that the defects announce themselves all at once.
By then three things have happened. The joiner has moved to another site. The paint crew has painted over the substrate problem you should have caught before topcoat. And the client has started keeping their own list, which is always longer and pettier than yours.
A pattern worth naming: most late finish rework was visible three weeks earlier and nobody had authority or a form to reject it. The foreman saw the door gaps. The QA walk didn't happen because the trade "wasn't finished yet." So the defect got sealed under the next layer of work.
The fix isn't more inspections. It's inspecting the right sample at the right gate, with a severity call that everyone agreed to in advance, and an SLA that says how fast it gets fixed before the trade is allowed to proceed.
Sampling: stop trying to inspect everything
You cannot walk every wall and every door on a fit-out with 180 doors and 6,000 m² of painted surface. When PMs try, they either burn a week or they fake it — a quick glance and a signature. Neither works.
Keep your construction projects on schedule and budget.
Projbrick helps you plan, track, and manage every project phase with precision and ease.
- Real-time project tracking
- Resource & budget management
- Team collaboration tools
No credit card required
Sample by repeating element and by risk zone instead. Finishes are batch-produced, so defects cluster. If the first three door sets from a batch show the same edge-banding lift, the whole batch has it. You don't need to check all 180 — you need to check enough to detect the pattern and reject the batch.
Practical sampling locations for paint and joinery:
-
First-off inspection — the first completed unit of each finish type (first painted room of a spec, first installed door set, first run of skirting). This is your benchmark. Approve it and it becomes the standard everything else is measured against.
-
Batch samples — 1 in 10 for joinery items from the same production batch, minimum 3 per batch. If two of three fail, inspect the whole batch.
-
Risk zones — anywhere with raking light (windows, wall-washer lighting), high-touch areas (reception, lift lobbies), and anywhere the client's designer specified a feature finish. These get 100% inspection because that's where disputes actually happen.
-
Interface points — where joinery meets paint meets floor. Reveals and shadow gaps live here, and this is where three trades blame each other.
Pro-tip: If two of three batch samples fail, inspect the whole batch immediately.
The mistake people make is random sampling across the whole floor. Random sampling detects nothing useful because it ignores that defects come in batches and cluster in specific lighting conditions. Sample where the risk actually concentrates.
The defect‑severity matrix (the part that stops the arguments)
Every finish argument on site comes down to one unspoken question: does this actually need fixing, or is the client being precious? Without a shared severity scale, that gets decided by whoever shouts loudest during the walk. Write it down before anyone picks up a brush.
Here's a working severity matrix for paint and joinery. Adjust the tolerances to your spec, but keep the structure.
| Severity | Definition | Paint examples | Joinery examples | Action |
|---|---|---|---|---|
| S1 – Reject | Fails spec, visible at normal viewing distance in normal light, or affects function | Runs, sags, missed coats, wrong sheen/colour, roller stipple over spec | Cracked panel, non-closing door, edge-band lift >2mm, gap outside tolerance | Stop trade progression. Fix before next layer. |
| S2 – Major | Visible under raking/feature light or at close inspection, cosmetic but breaches tolerance | Sheen inconsistency, visible lap marks, touch-up flashing | Proud/uneven reveals, inconsistent shadow gaps, visible fixings | Remediate within SLA. Trade may proceed elsewhere. |
| S3 – Minor | Only visible on deliberate close inspection, within reasonable tolerance | Fine texture variation, minor debris in film | Slight scribe gap within tolerance, minor handling mark | Log to snag list. Batch-fix before handover. |
| S4 – Observation | Meets spec, noted for monitoring | Colour looks slightly different wet (will cure out) | Timber movement to watch | No action. Record only. |
The value of this table isn't the categories — it's that you agree it with the client's rep and the subcontractor before finishes start. Once everyone has signed the matrix, the flashlight-at-a-sideways-angle argument is over. You point at the raking-light clause. It's S2, here's the SLA, it's already in the workflow.
Worth noting: this severity logic is the same backbone used in broader QA systems that tie QA/QC to phase gates with sampling plans and defect‑triage matrices. Finishes are just where the tolerances are tightest and the disputes are most personal.
Remediation SLAs: how fast, and who's allowed to keep working
A defect logged with no deadline is a defect that reappears on the closeout list. The SLA turns "we'll sort it" into an actual date — and more importantly, it decides whether the trade keeps progressing while the fix is outstanding.
-
S1 (Reject) Trade progression stops on that element/zone. Fix within 48 hours or the batch is quarantined and the next work sequence (e.g. second-fix over that joinery) is held. No sign-off, no proceed.
-
S2 (Major) Remediate within 5 working days. Trade may continue in other zones. Re-inspection required before that zone is closed.
-
S3 (Minor) Batch-remediate before the pre-handover walk. Grouped by trade so the crew does one efficient pass instead of ten call-backs.
-
S4 (Observation) No SLA. Monitored to handover.
The reason the S1 "stop progression" rule matters operationally: finish defects get buried by the next trade. If you don't hold the sequence, the substrate defect the painter should have caught gets topcoated, the wall the sparky needs to chase gets painted over, and the fix cost multiplies. Holding progression on S1 is the cheapest insurance you have.
Below is a simple workflow for defect triage and SLA assignment.
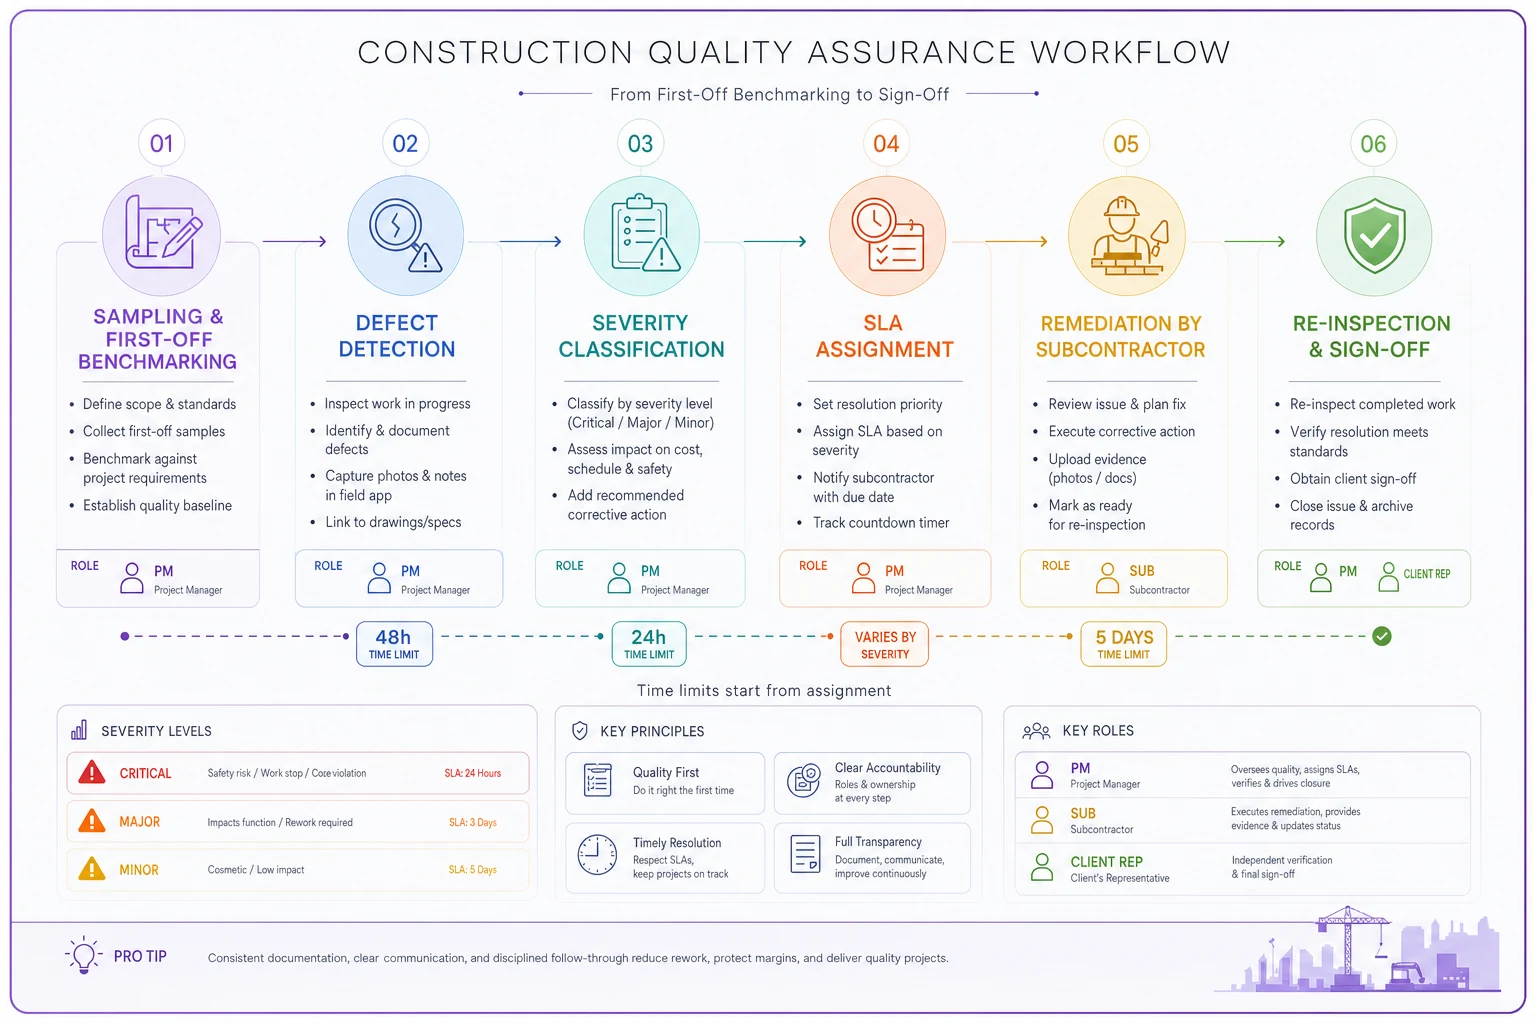
One thing PMs consistently underestimate is the cost of a demobilized subcontractor coming back. A crew fixing 15 doors while they're still on site is a half-day job. The same 15 doors after they've left is a mobilization charge, a scheduling fight, and usually a couple of weeks of delay. The SLA exists to keep the fix inside the mobilization window.
A short real scenario
A commercial fit-out — roughly 2,400 m² across two floors, mid-range office spec with feature timber joinery in the reception and meeting suites. Painting and joinery both running concurrently in the final six weeks.
No formal finish acceptance packet at the start. The team did a single QA walk when both trades reported "finished." That walk produced a punch list of around 290 items. The reception feature wall — raking light from full-height glazing — showed lap marks across three panels that had already been signed as complete. The joinery reveals at the meeting-room fronts were inconsistent because the first-off was never benchmarked, so every subsequent unit drifted. Both trades had partially demobilized. Remediation, re-mobilization and the resulting handover slip cost the project somewhere around three weeks and a five-figure back-charge fight that soured the relationship with a decent subcontractor.
The retrofit on the next phase was straightforward: first-off benchmark signed for each finish type, the severity matrix agreed with the client's rep before finishes started, batch sampling at 1-in-10 for joinery, and 100% inspection only in the raking-light zones. The pre-handover walk on that phase produced closer to 70 items, most of them S3 batch-fixes handled in a single pass while crews were still on site. The feature wall never became a dispute because the first-off had already established the acceptable sheen and it was signed by the client. No re-mobilization charge. Handover held.
Same trades, same spec. The difference was catching the pattern at the first-off and the batch sample instead of at the final walk.
The final acceptance checklist
Run this before you call any finish trade complete on a zone. It's deliberately short — a field packet, not a novel. If a line fails, it goes to the severity matrix and the SLA, not into a vague "to-do" list.
Paint acceptance
-
- [ ] First-off benchmark signed and available for comparison
-
- [ ] Colour, sheen and coat count verified against approved spec/sample
-
- [ ] Raking-light check completed in all feature/glazed zones
-
- [ ] No S1 defects (runs, sags, missed coats, wrong sheen) outstanding
-
- [ ] Touch-ups blended, no visible flashing at normal viewing distance
-
- [ ] Substrate/interface (paint-to-joinery, paint-to-floor) clean and sharp
-
- [ ] Protection reinstated where following trades still active
Joinery acceptance
-
- [ ] First-off benchmark signed for each element type (doors, skirting, feature runs)
-
- [ ] Batch sample completed (1-in-10, min 3) with results logged
-
- [ ] Doors close, latch and align within tolerance; gaps consistent
-
- [ ] Reveals and shadow gaps consistent across the run
-
- [ ] Edge-banding secure, no lift; visible surfaces free of handling damage
-
- [ ] Fixings concealed/consistent per spec
-
- [ ] Interface with paint and floor within tolerance at all junctions
Packet close-out
-
- [ ] All S1 defects cleared and re-inspected
-
- [ ] S2 defects within SLA with re-inspection dates set
-
- [ ] S3 batched for pre-handover pass, grouped by trade
-
- [ ] Client's rep countersigned the zone acceptance
-
- [ ] Photos logged against each accepted zone for the record
That last line matters more than it looks. A photographed, countersigned zone is your defense when the client's rep comes back three weeks later with a new list. Acceptance that isn't recorded isn't acceptance — it's a memory, and memories lose arguments.
When this level of rigour makes sense — and when it doesn't
When it's worth it: high-spec commercial fit-outs, hospitality, residential where the client walks with a designer, anywhere with feature finishes or raking light, and any job where the subcontractor demobilizes fast. The more the finishes are on show and the more trades interface, the more this packet pays for itself.
When it's overkill: back-of-house areas, plant rooms, temporary works, low-spec repeat units where the tolerance is genuinely loose. Running a full raking-light protocol on a warehouse mezzanine wall is wasted effort. Sample it, log it, move on.
Who should not lean on this too hard: a PM who uses the packet as a paperwork ritual instead of an early-detection tool. The value is the first-off benchmark and the batch sample — the early catch. If you're filling in the checklist only at the final walk, you've built a nicely formatted punch list and changed nothing. The point is to inspect the sample that predicts the batch, not to document the failure after it's baked in.
Where this fits in the bigger closeout picture
A finish acceptance packet isn't a standalone document — it feeds the handover. Every countersigned zone, every cleared S1, every logged photo becomes evidence in the closeout file, which is exactly what keeps final accounts from stalling. If you're building the wider system, this packet slots directly into a closeout system with mandatory packets, commissioning gates and SLA timelines, where finish acceptance is one of the gates that has to close before the money moves.
Keeping all of this in a shared platform — the signed benchmarks, batch sample results, severity calls, SLA clocks and re-inspection dates — is where operational software earns its keep. Not because it's clever, but because a defect with a live SLA clock and an assigned owner doesn't quietly disappear the way a scribbled snag on a clipboard does. The tracking itself is boring; the point is that nothing falls through between the walk and the fix.
Finish rework isn't really a quality problem — it's a timing problem. The defects that blow up your handover were almost all visible early, at the first-off or the first batch sample, when a crew still on site could have fixed them in hours rather than weeks. Sample where the risk clusters, agree the severity scale before anyone starts, put a clock on the fix, and record what you accept. Do that consistently and the closeout walk stops being an ambush and starts being a formality.
Ready to build smarter and faster?
Join 2,000+ construction teams using Projbrick to improve project visibility, reduce delays, and increase profitability.