



Cold pours don't usually fail at the moment you place them. They fail three to seven days later, when someone strips forms on a slab that never got past 40% of its design strength, or when a footing that froze in the first eight hours shows up with a crumbly, chalky surface a fingernail can scratch. By then the ready‑mix truck is long gone, the weather looks fine, and everyone's trying to figure out who signed off on the pour.
That gap — between the decision to pour and the failure showing up — is exactly why cold weather concrete needs a written trigger system instead of a superintendent's gut feel at 6 a.m. This is a working cold weather concrete playbook: the temperature thresholds that actually matter, which admixtures to spec and which to avoid, a pre‑pour checklist you can hand a foreman, and an emergency warm‑curing workflow for when the forecast turns on you mid‑cure.
This isn't a general concrete guide. It's specifically about not losing a pour to cold.
First, get the temperature definitions straight
The most common mistake isn't ignoring the cold — it's using the wrong temperature. Crews check the air temp on their phone, see 38°F, and call it borderline. But ACI 306 defines cold‑weather conditions based on a three‑day average and, more importantly, the concrete cares about its own temperature, not the weather app.
| Measurement | What it tells you | Trigger point |
|---|---|---|
| Ambient air (forecast low) | Whether you're in a cold‑weather regime at all | 3 consecutive days with avg below ~40°F |
| Concrete placement temp | Whether the mix is warm enough to react | Below 50°F for thin sections is a problem |
| Surface temp of subgrade/forms | Whether you'll flash‑cool the bottom | Frozen or below 35°F = no‑go |
| First‑24hr protected temp | Whether hydration will actually proceed | Must hold above 50°F |
| Freezing threshold (the real enemy) | Point where fresh concrete gets permanent damage | ~25°F before reaching ~500 psi |
The row people consistently underestimate is the subgrade. You can have 55°F concrete going onto ground that's frozen an inch down, and the bottom of your pour loses heat straight into it. Classic situation: a garage slab poured on a sunny 45°F afternoon over ground that had four nights of hard frost. Top looked perfect. The bottom two inches never cured properly and the slab dusted within a month.
The temperature triggers that decide go / no‑go
Turn that table into actual decisions. These are the thresholds worth writing into your spec so nobody has to improvise:
Keep your construction projects on schedule and budget.
Projbrick helps you plan, track, and manage every project phase with precision and ease.
- Real-time project tracking
- Resource & budget management
- Team collaboration tools
No credit card required
-
Minimum concrete‑as‑placed temperature 55°F for sections under 12 inches, 50°F for sections 12–36 inches. Thin stuff loses heat fast, so it needs to start warmer.
-
Do not place on frozen ground. Ever. If the subgrade is frozen or has standing ice, it's an automatic no‑go regardless of air temp.
-
Protect until 500 psi. Fresh concrete that freezes before hitting roughly 500 psi can lose 20–50% of its strength permanently. That number matters more than any calendar‑day rule.
-
Falling forecast trigger if the 24‑hour low after placement is projected below 32°F and you don't have protection confirmed, that's a no‑go.
-
Wind matters more than the thermometer suggests. A 20 mph wind at 40°F pulls heat off a fresh surface fast and adds plastic shrinkage cracking on top of the cold problem.
A no‑go doesn't have to mean canceling the day. Usually it means: heat the aggregate and water, reschedule to the warmer part of the day, or add ground thawing and blankets before you commit. The point of the trigger is to force that decision before the truck shows up — not while it's spinning on the clock at $150+/hour in standby.
Admixtures: what to spec, and the one that gets misused
Cold‑weather admixtures do two things — speed up early strength to get past that 500 psi danger zone faster, and lower water content so there's less to freeze. The mistake that keeps showing up is treating "accelerator" as one interchangeable thing.
Non‑chloride accelerators (calcium nitrite/nitrate based) are the default for anything with steel — reinforced slabs, footings, walls. They speed hydration without the corrosion risk.
Calcium chloride works and it's cheap, but it corrodes rebar and prestressing steel. The pattern plays out like this: a crew grabs a chloride accelerator because it's on the shelf, uses it in a reinforced slab, and creates a corrosion problem that surfaces years later as rust staining and spalling. Rule worth writing down: no calcium chloride in reinforced or prestressed concrete, period. If you use it at all, keep it to plain unreinforced work.
-
Water reducers let you cut water content — less free water to freeze, denser mix. Worth having in almost any cold mix.
-
Air entrainment is non‑negotiable if there's any freeze‑thaw exposure — target 5–7%. This isn't about the pour day, it's about surviving the next ten winters. Skipping it on exterior flatwork is one of the more expensive shortcuts in the business.
-
Heated mix water is the simplest lever of all and doesn't come out of an admixture bag. Warming batch water is the cheapest way to raise placement temperature. Ask your ready‑mix supplier for a heated mix and confirm the delivered temp on the ticket.
One coordination note: accelerators shorten working time. If you're already running a tight pour, that compressed window changes your labor sequencing. It's exactly the kind of thing that matters when you're working from a minute‑by‑minute concrete micro‑schedule — when the mix sets faster, your finishing crew needs to be staged and ready, not waiting on the next task.
Curing rules for cold weather
Curing is where cold pours are actually won or lost, because the whole game is holding hydration heat in long enough for the concrete to protect itself.
Keep protected concrete above 50°F for at least the first three days for most mixes, longer for larger structural pours. Insulated blankets are the workhorse — but they only work if they're in contact and lapped, not draped loose with gaps at the edges where cold sneaks in.
Insulated blankets are the workhorse — but they only work if they're in contact and lapped, not draped loose with gaps at the edges where cold sneaks in.
Watch the strip‑and‑remove decision carefully. In warm weather you strip forms on schedule; in cold weather forms are often helping by holding heat, so leaving them longer is protective. The failure mode is a crew stripping on the normal calendar day without checking maturity, exposing warm concrete to a cold night, and thermally shocking the surface.
Avoid rapid cooldown at the end of the protection period. Pulling all the blankets at once off a 60°F slab into a 20°F morning can crack the surface from the sudden gradient. Ease it — pull protection gradually or during the warmer part of the day.
Don't rely on calendar days if you can avoid it. Use maturity meters or field‑cured cylinders kept next to the actual pour — not in a warm office — to know your real strength. The cylinder that lived in the site trailer overnight tells you nothing about the slab that sat under a blanket in the wind.
The pre‑pour checklist
Hand this to whoever owns the pour. Every box gets checked before the first truck is released, not after.
-
[ ] Three‑day forecast pulled and low temps recorded for placement day + 3 days
-
[ ] Concrete placement temp confirmed with supplier (heated water/aggregate arranged if needed)
-
[ ] Subgrade checked — not frozen, no ice, no standing water
-
[ ] Admixture package confirmed correct for reinforcement type (no chloride in reinforced work)
-
[ ] Air entrainment specified if any freeze‑thaw exposure
-
[ ] Insulated blankets / heaters / enclosures on site and counted, not "on the way"
-
[ ] Ground thawing done if subgrade was frozen (heaters + cover, verified)
-
[ ] Maturity meters or field cylinders ready and a plan for where they're stored
-
[ ] Wind protection planned if gusts over ~15 mph expected
-
[ ] Named person responsible for overnight temperature monitoring
-
[ ] Go/no‑go decision documented with who made it and the temps at that time
That last box matters more than it looks. When a pour goes wrong, the argument is always about what conditions were at decision time. Writing it down turns a finger‑pointing session into a two‑minute lookup.
Emergency warm‑curing workflow when the forecast turns
You poured on a decent afternoon and now a cold front is arriving faster than predicted. The concrete hasn't hit 500 psi and the overnight low just got revised from 34°F to 22°F. This is the scenario the playbook exists for.
-
Confirm current maturity/strength. Check your field cylinders or maturity meter. If you're already past ~500 psi, your risk drops sharply and you're protecting for quality, not survival. Below that, you're in emergency mode.
-
Get protection down immediately. Blankets first, lapped and weighted at edges. Every hour of exposed surface in a falling temp costs you strength.
-
Add active heat if blankets alone won't hold 50°F. Ground heaters and enclosures with indirect‑fired heaters. Never vent combustion heaters directly onto fresh concrete — the CO2 carbonates the surface and leaves a soft, dusting skin.
-
Assign overnight monitoring. Someone checks concrete surface temp every few hours and logs it. If temps drop despite protection, escalate to adding heat.
-
Document conditions at each check. Timestamps, temps, actions taken. This is your evidence packet if anyone questions the pour later.
-
Make the morning strip decision on data, not the calendar. Only remove protection when strength is confirmed and the daytime temp reduces thermal shock risk.
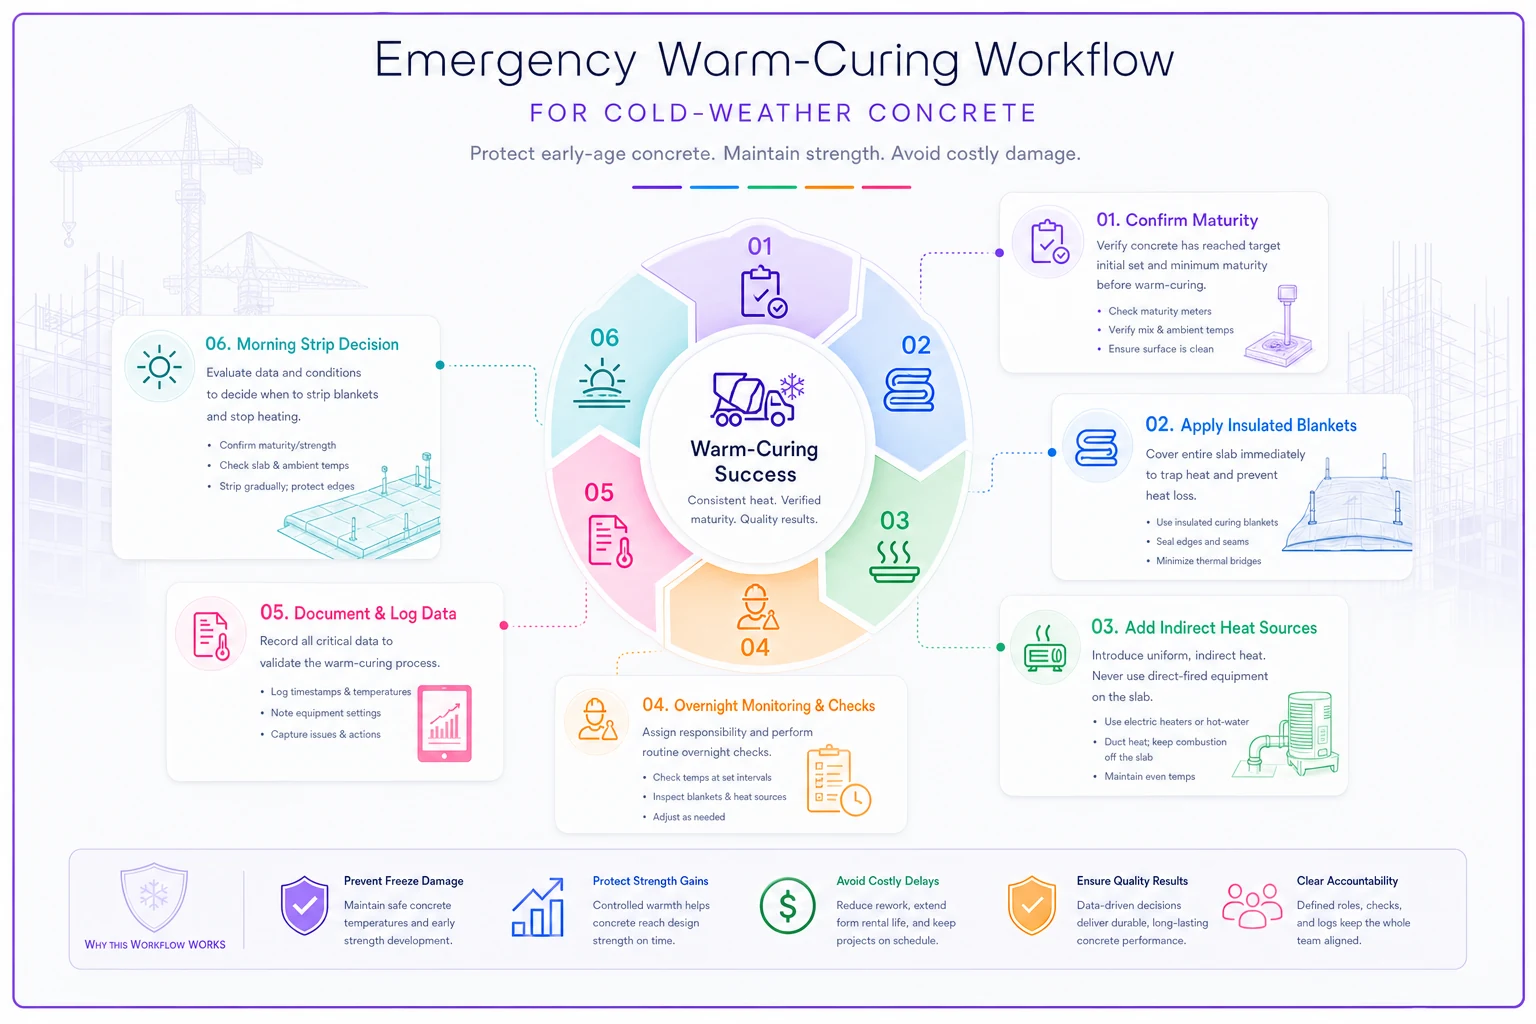
The heater mistake in step 3 is worth repeating because it's so common. A crew, panicked about the cold, points a propane salamander straight at a fresh slab. The concrete stays warm, everyone relaxes — and two weeks later the surface is chalky and soft from carbonation. Indirect heat or vented enclosures only.
Notification SLAs: who needs to know, and how fast
Speed matters here because concrete doesn't wait for your phone tree. Set these response windows before winter, not during the emergency:
| Trigger event | Who gets notified | Response SLA |
|---|---|---|
| Forecast low revised below freezing pre‑pour | PM + super + concrete foreman | Within 1 hour, before truck release |
| No‑go called on pour day | PM + scheduler + ready‑mix supplier | Immediate — cancel/reschedule delivery |
| Overnight temp dropping below protection target | On‑call super + PM | Within 30 min of reading |
| Suspected freeze damage after strip | PM + QA/QC + structural engineer | Same day, with photos + temp log |
| Heater/enclosure failure during cure | On‑site lead + PM | Immediate escalation |
The overnight situation is where projects get burned. Somebody notices the temp dropping at 2 a.m., doesn't want to wake anyone up, and by 6 a.m. the damage is done. A clear SLA — with a named on‑call person — removes the hesitation. Waking someone up at 2 a.m. is cheaper than repouring a footing.
Keeping temperature logs and go/no‑go decisions in one accessible place, rather than scattered across texts and a foreman's memory, is what makes those SLAs actually hold up in practice. A solid field‑to‑office data setup where overnight readings and decisions are logged and visible means the PM sees a dropping trend in the morning instead of discovering a failed pour a week later.
A real scenario
A mid‑size commercial contractor was placing spread footings for a two‑story addition in late November. Forecast showed a 41°F low for placement night — borderline but workable. They poured mid‑morning with heated mix water, laid blankets, and figured they were covered.
Two of the footings were on the north side of the building, in shade, over ground that had frozen the previous two nights. Nobody checked subgrade temp separately. The blankets held the tops fine, but those two footings lost heat into the frozen ground and never developed proper bottom strength. It showed up during backfill inspection — soft, under‑strength concrete on the bottom face.
The repour, demo, and schedule hit cost them somewhere in the range of $8k–$12k, plus about a week of slippage that rippled into the framing crew's start. The fix afterward cost almost nothing: a subgrade temperature check added to the pre‑pour checklist, and a rule requiring ground thawing for any footing over frozen ground. The next winter they poured through several cold snaps with zero repours — not because they got lucky, but because the frozen‑subgrade trigger caught the ones that would have failed.
When cold‑weather pours make sense — and when to just wait
Not every cold pour is worth doing. Sometimes the right call is to reschedule.
It makes sense to pour when you've got protection equipment on site, a heated mix confirmed, subgrade prepped, and someone accountable for overnight monitoring. Schedule pressure is real, and with the full playbook in place you can pour reliably well below freezing.
It's a bad idea when protection is "on the way," when nobody's staying to monitor overnight, or when you're placing thin flatwork exposed to wind with no enclosure. Those are the pours that look fine at 4 p.m. and fail by the following week.
Who should just wait: if the three‑day forecast shows a hard, sustained freeze and you don't have heated enclosures, and the pour isn't on the critical path — eat the day. A one‑day delay is cheap. A repour plus the inspection fight plus the downstream schedule hit is not.
The whole point of a written trigger system is to make that call before the truck is on the clock. Cold pours don't punish you for being cautious. They punish you for guessing.
The whole point of a written trigger system is to make that call before the truck is on the clock. Cold pours don't punish you for being cautious. They punish you for guessing.
Ready to build smarter and faster?
Join 2,000+ construction teams using Projbrick to improve project visibility, reduce delays, and increase profitability.